...
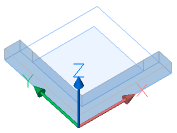
关于Quickdraw工具使您可以轻松地开始进行概念建模。它还会自动添加BIM数据。您可以使用Quickdraw工具创建房间或整栋建筑物。使用后,Quickdraw将保持活动状态,直到您明确退出命令或执行另一个命令为止。
![]()
![]()
有关此命令的更多信息,请访问“命令参考”文章BimQuickDraw。
...
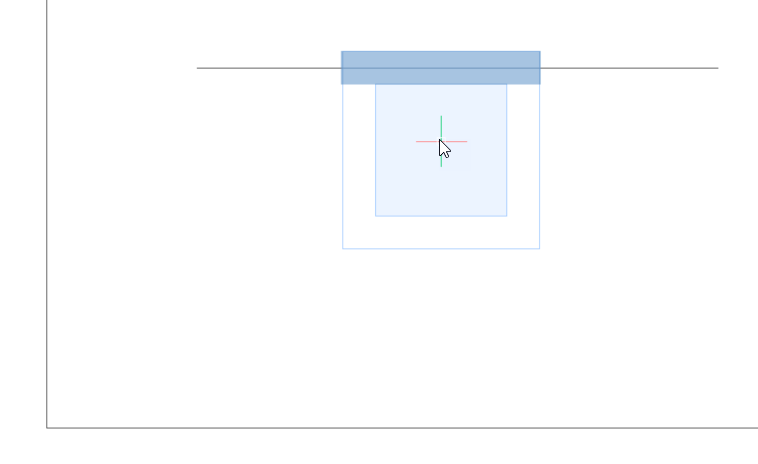
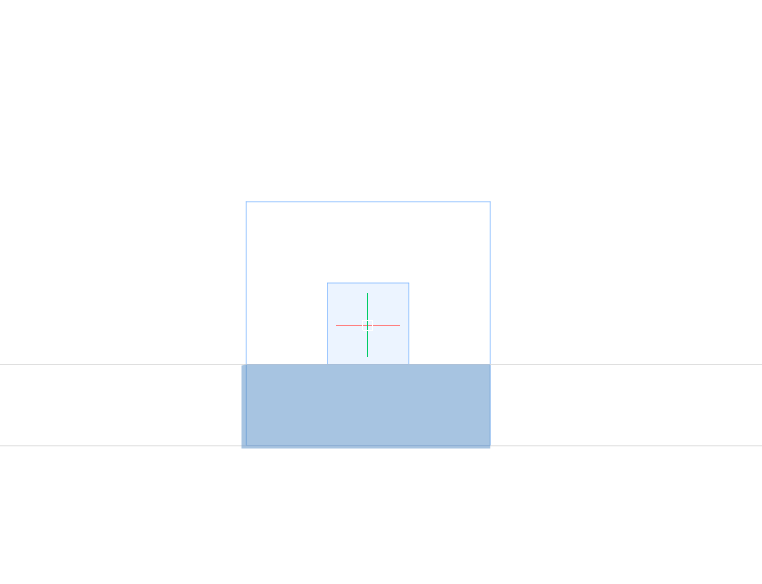
使用磁性捕捉功能,可以轻松对齐QuickDraw光标。激活该命令后,将光标移到要对齐的对象附近。QuickDraw光标会自动捕捉到对象。
您有以下选择:
| 1.对准原点 |
| |
| 2.与现有墙对齐 | 到墙本身 |

|
在墙的范围内 |

| |
| 3.对齐线 | 到网格线 |

|

|

|
到X和Y对齐的线和线段 |


|

|
平行线 |

|

设置Quickdraw系统变量
您可以使用“快速绘图设置”来设置“快速绘图”系统变量:
When the Quad cursor is in the 'No Selection' state (nothing is highlighted or selected), select Quickdraw from the Model tab, click the Quickdraw icon in the ribbon or type BIMQuickdraw in the commandline.
You are prompted: Select first point or [quickdraw Settings]:
Enter S for the Quickdraw Settings.
Specify a new value to the system variables of Quickdraw to change their default values (e.g. Default Wall Width, Default Slab Thickness, and Default floor to floor distance).
When the "auto adapt sizes"-option is turned on, the dimensions of the walls and slab of the new room will be the same as the walls and slab you snap to.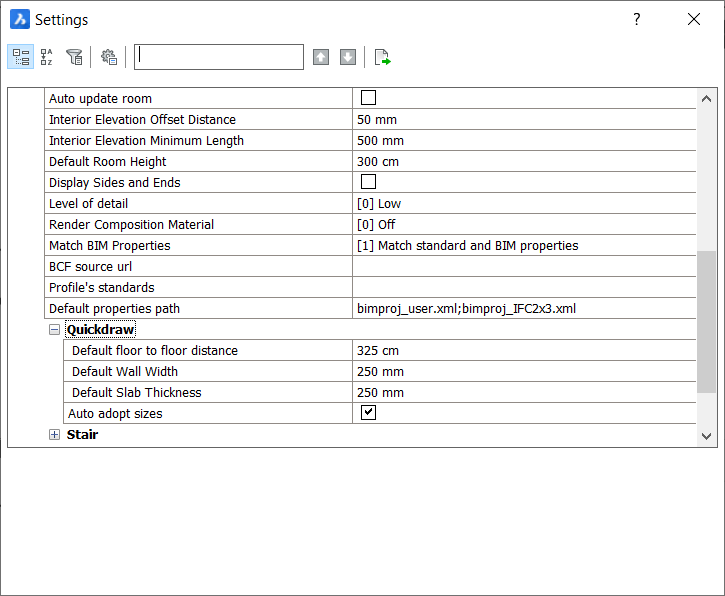
在运行Quickdraw时更改系统变量
可以在启动“快速绘制”命令时编辑将绘制的墙的尺寸。在“快速绘图设置”对话框中更改这些设置,在提示菜单中选择设置,或在命令行中输入特定字母,然后按Enter键以更改尺寸。
...
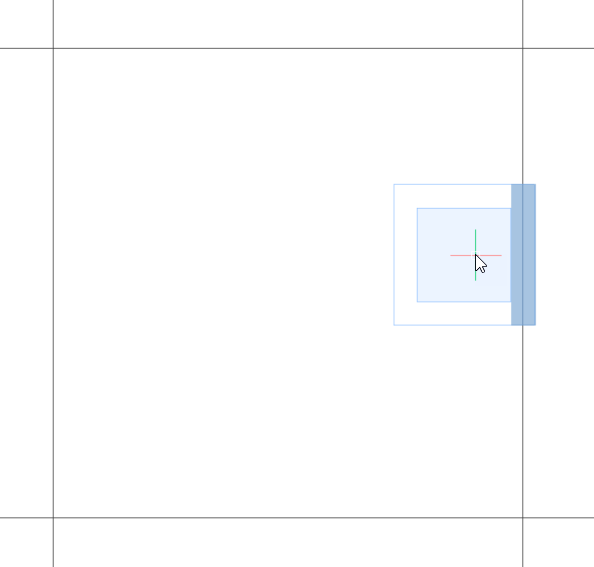
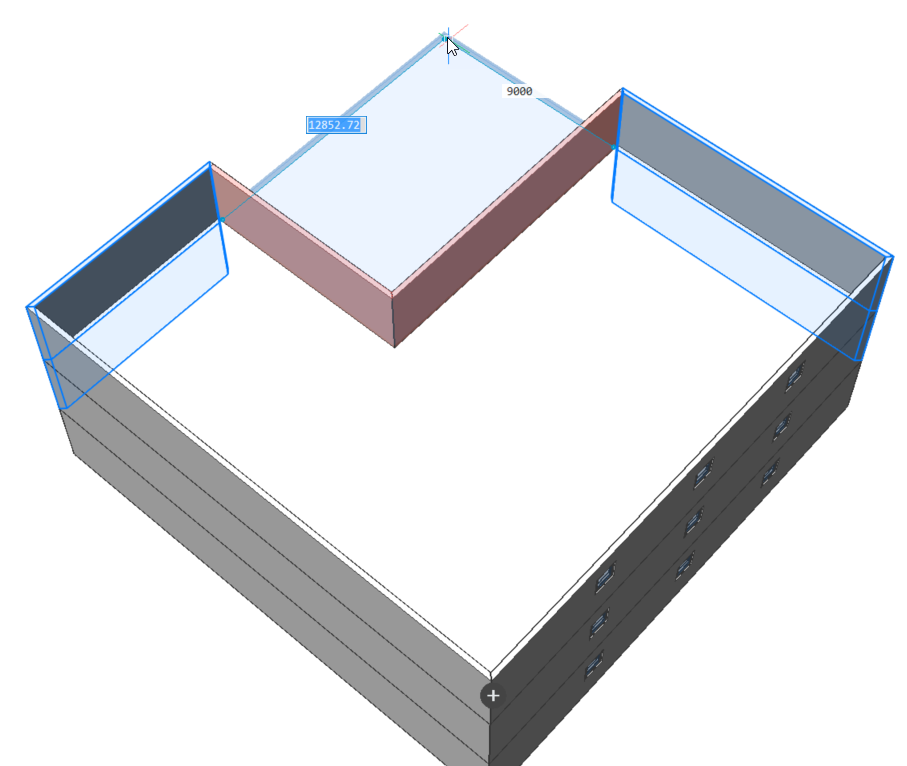
- 拖动鼠标光标以定义建筑物的占地面积。
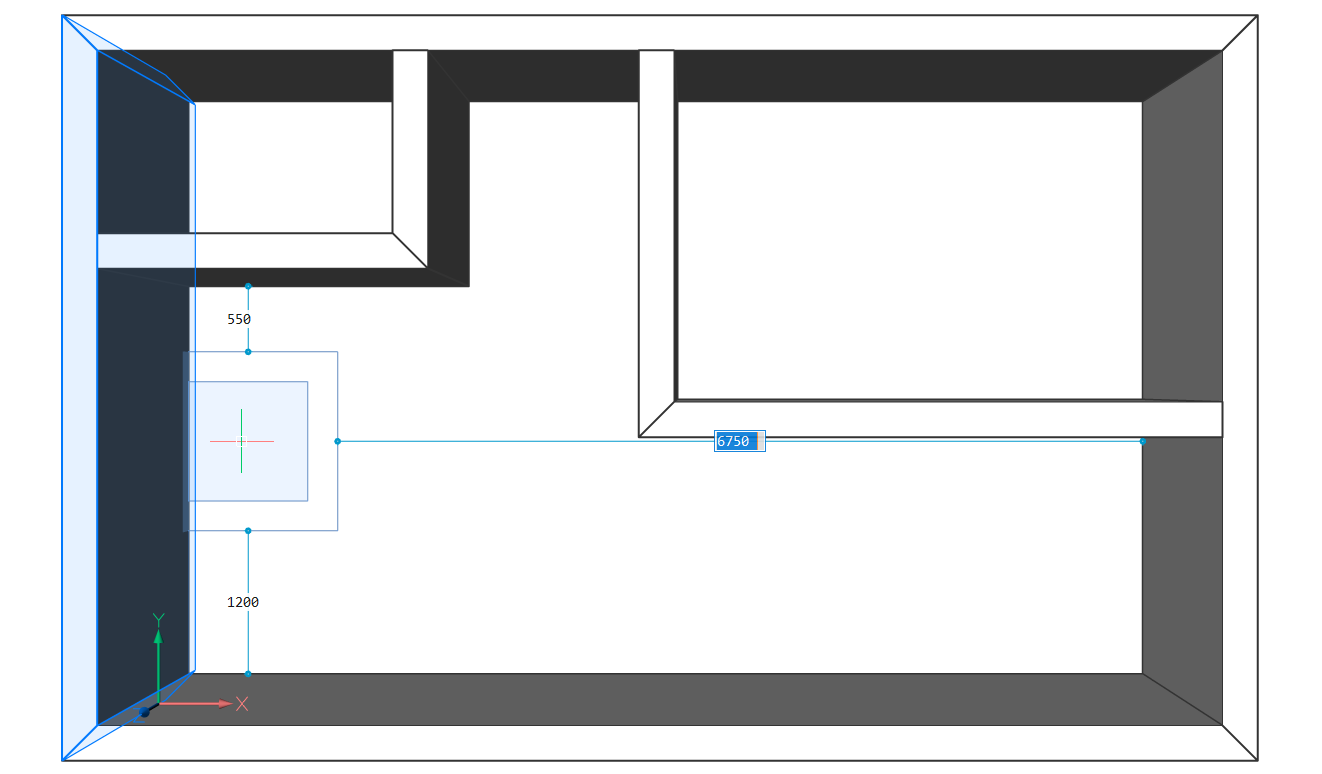
Note: If the Dynamic dimension (DYN) option is on, the current values of the room width (1) and length (2) are displayed in a dynamic dimension field.
Specify the values of the room width and length in the Dynamic dimension field. Press the Tab key to switch between width and length and press Enter or just click freely. Press Enter or Escape to leave the Quickdraw command or you can continue to create more rooms.

Place the Quickdraw cursor inside the existing building to create more rooms.
When you place the Quickdraw cursor inside the existing building, the dynamic dimension fields display the distances from the Quickdraw cursor to the adjacent walls (3,4,5,6).
When the "auto adapt sizes"-option is turned on, the dimensions of the walls of the new room will be the same as the wall you snap to.

If the cursor aligns with one or two existing walls in the model, the layout of the cursor will adapt and depict the alignment.

To actually draw new walls, choose the distances from the already existing walls to specify your first point. Move your cursor or type the values in the dynamic dimension fields to do this. Draw walls in the same way as explained in steps 2 and 3.
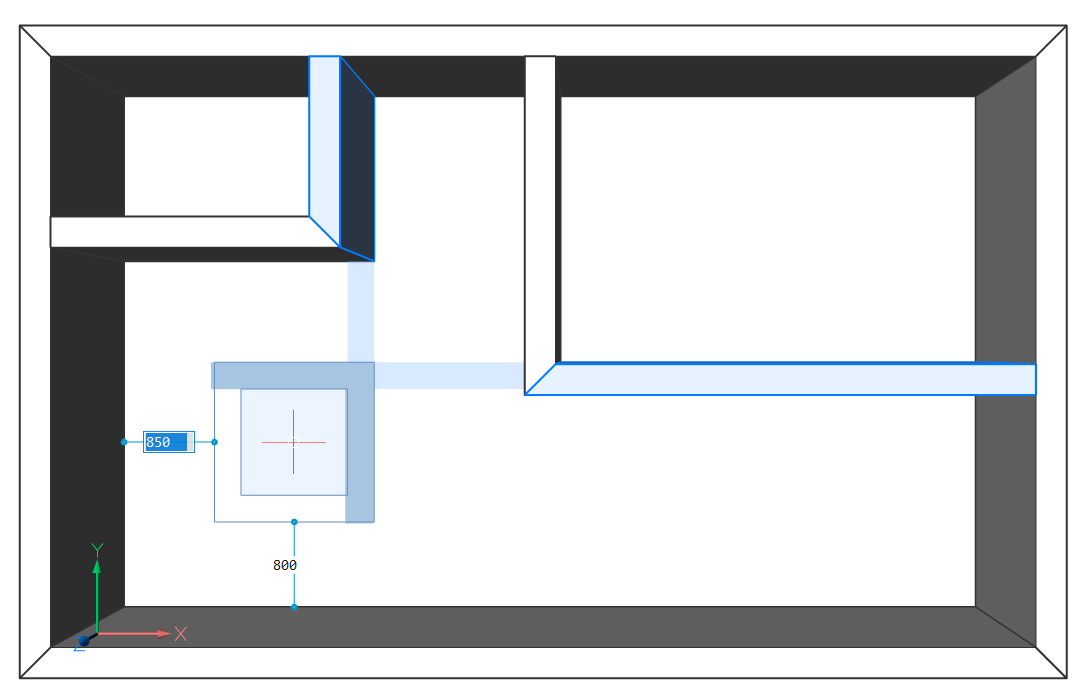
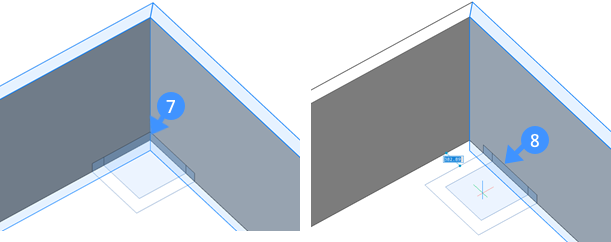
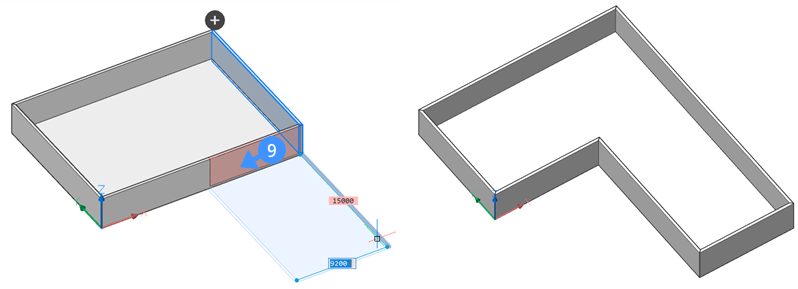
- 要从现有房间移除墙的一部分,首先,将Quickdraw光标与建筑物内侧的现有墙对齐。然后单击并将光标拖动到现有建筑物的外部。
外壁将变为红色(9),表示将被移除的部分壁。注意:您也可以将光标与建筑物外侧的现有墙对齐,以移除楼板的一部分。然后在现有建筑物内单击并拖动光标。
选择第二个点。以红色突出显示的墙将被自动删除,并创建一个L形的房间。

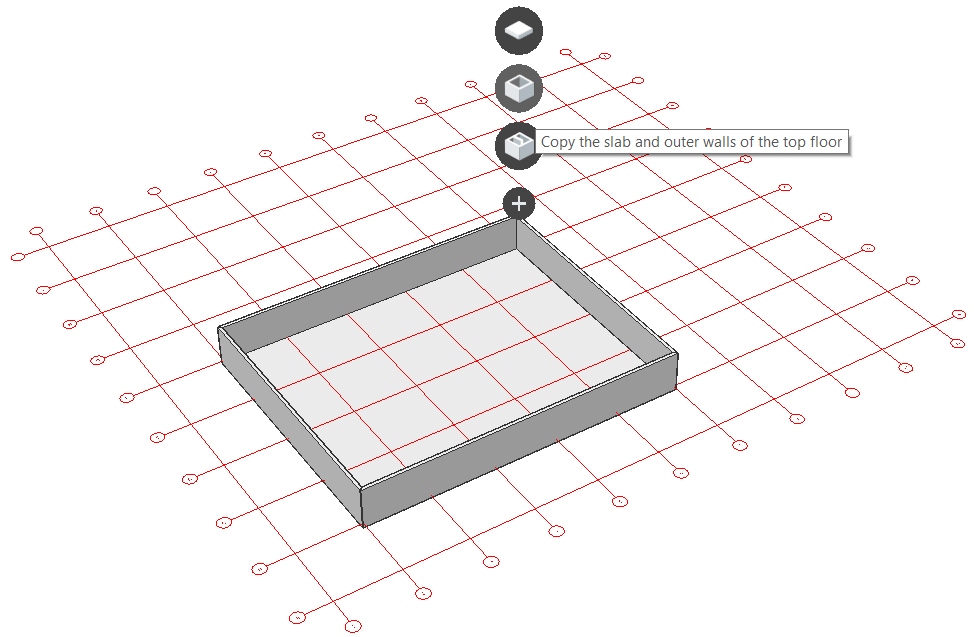
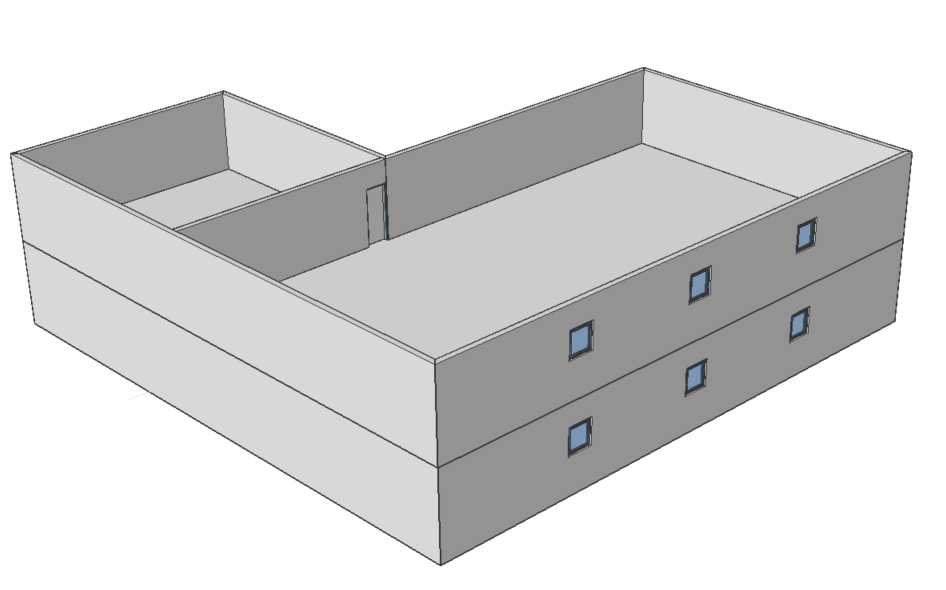
过程:创建故事和屋顶
从类似的配置开始:

请按照以下步骤创建两个额外的故事,一个浮动部分和一个平屋顶。
当四路光标在“无选择”状态(没有被高亮显示或选定的),选择的QuickDraw在模型选项卡或键入BIMQuickdraw在命令行。
单击图标(

 )以查看选项:
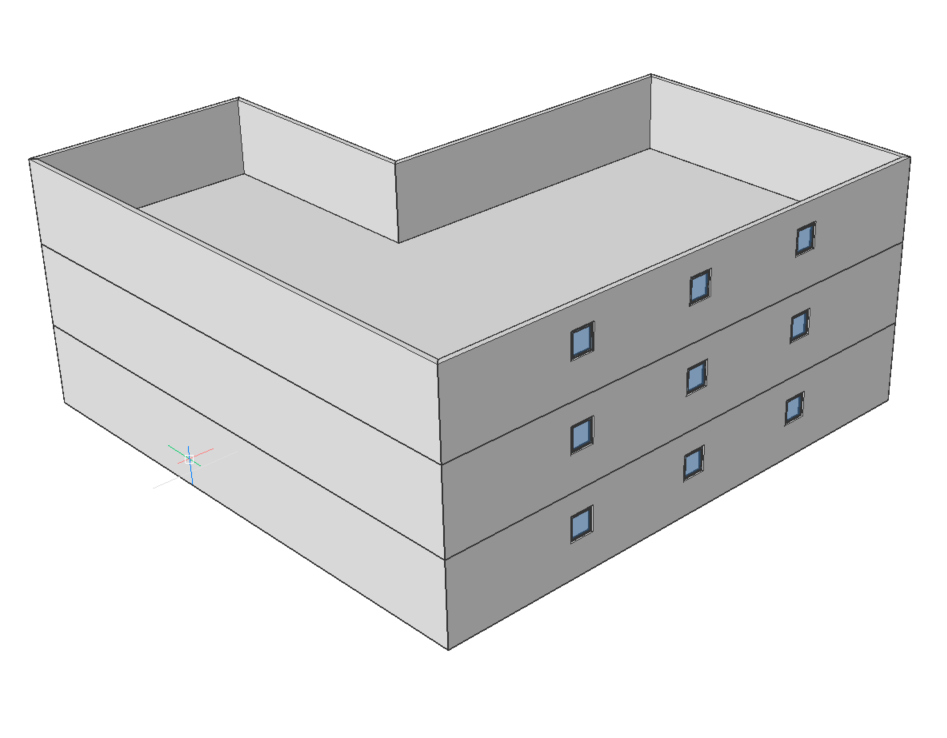
 顶层的完整副本。将复制所有功能(窗户,门,内墙和家具,不包括一楼外墙上的门)。
 复制楼板和顶层的外墙。
 用平屋顶完成建筑物。
对于第一个故事,请选择第一个选项(完整副本)。

注意:复制内墙和内门以及外墙的窗户。一楼外墙的门未复制。
注意:在这种情况下,不会复制家具,因为它没有分配给底层(请参阅“属性”面板)。如果要复制家具,请使用Bimify将家具分配到一个空间位置。新家具将自动分配到新的空间位置。在这种情况下,不会复制家具,因为它没有分配给底层(请参阅“属性”面板)。如果要复制家具,请使用Bimify将家具分配到一个空间位置。新家具将自动分配到新的空间位置。
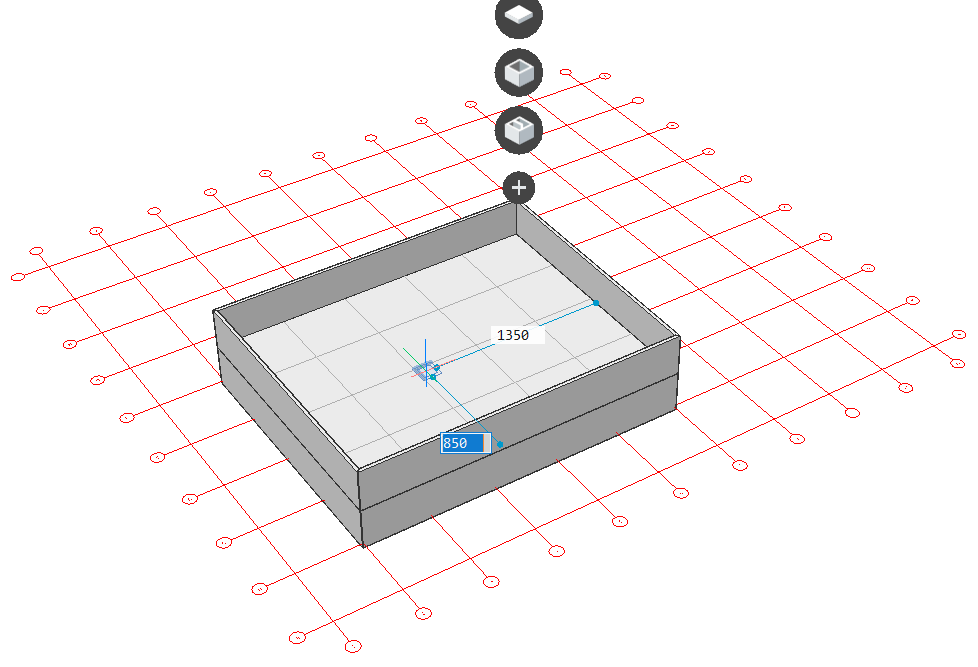
注意:墙继承了在其上创建的平板的空间位置。重复步骤2。选择第二个选项(复制楼板和外墙)以创建顶层。

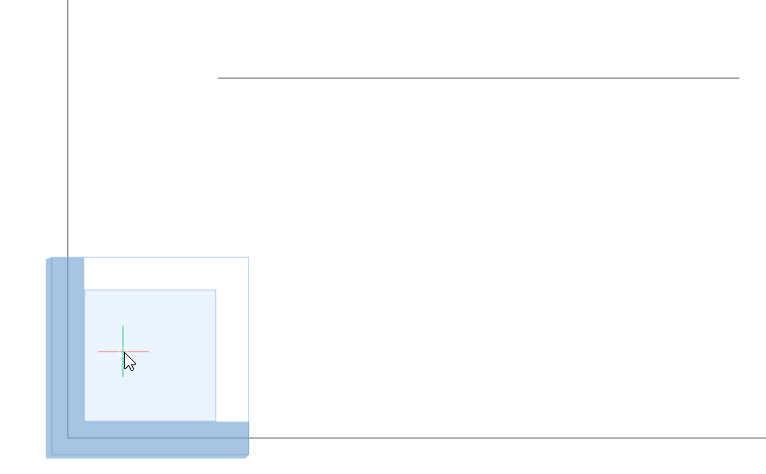
- To make the overhang you should remove parts of the outer walls of the second floor. First, snap the Quickdraw cursor in the corner of the two outer walls, inside the building. Then click and drag the cursor outside.
The outer walls will turn red to indicate that the walls will be removed.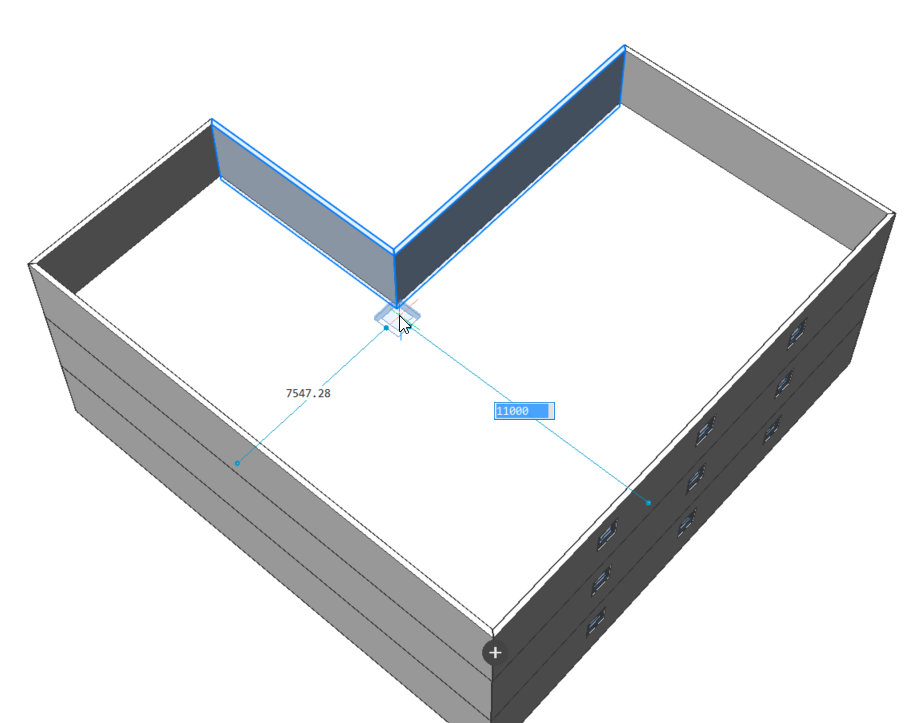


Use the same method as in step 2, selecting option 3 (Finish the building with a flat roof).


Procedure: Using Quickdraw starting from a 2D layout
Open a 2D floorplan of a rectangular or L-shaped building.
Note: it is also possible to draw a simple 2D floor plan with the (poly)line command to start from. In this case, the default wall thickness of the BIM Quickdraw command will be used.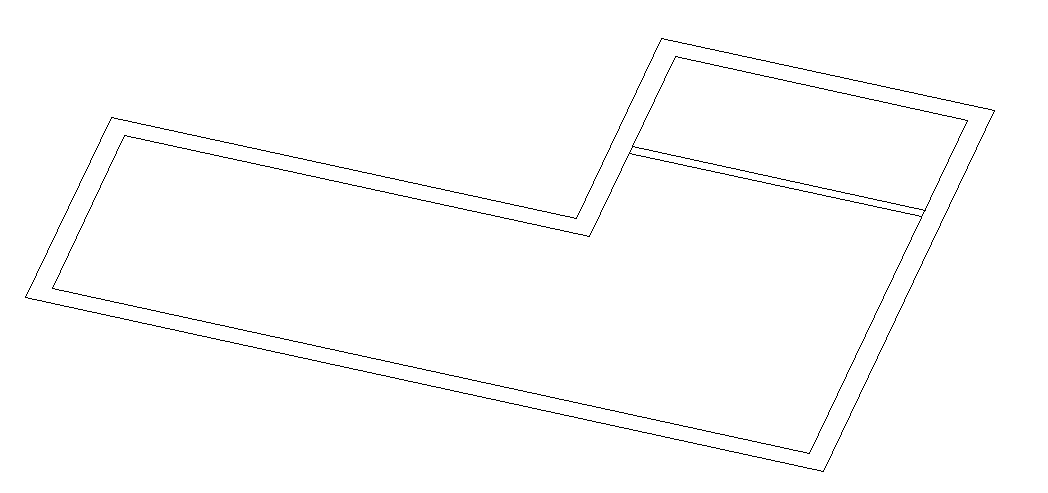

Note: The Quickdraw cursor now supports snapping to (double) lines inside XREFs.当Quad光标处于“无选择”状态(未突出显示或未选择任何内容)时,在“模型”选项卡中选择“快速绘制”,单击功能区中的“快速绘制”图标,或在命令行中键入BIMQuickdraw。
将光标悬停在外壁之一上。
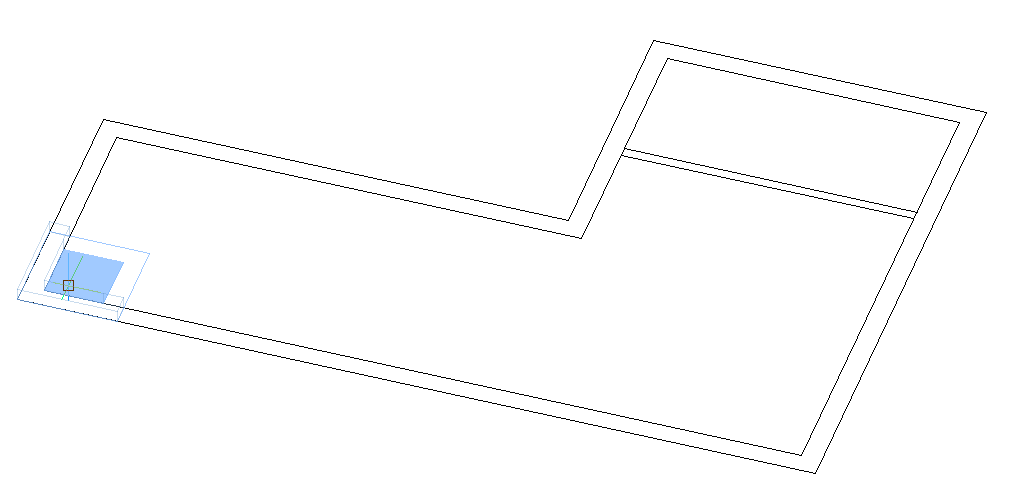
注意:墙的厚度会自动适应2D工程图的平行线之间的距离。
使用磁性捕捉功能绘制外壁,以捕捉到2D工程图的线条。


使用磁性捕捉功能将光标悬停在其中一个内壁上,以捕捉到2D工程图的线条。


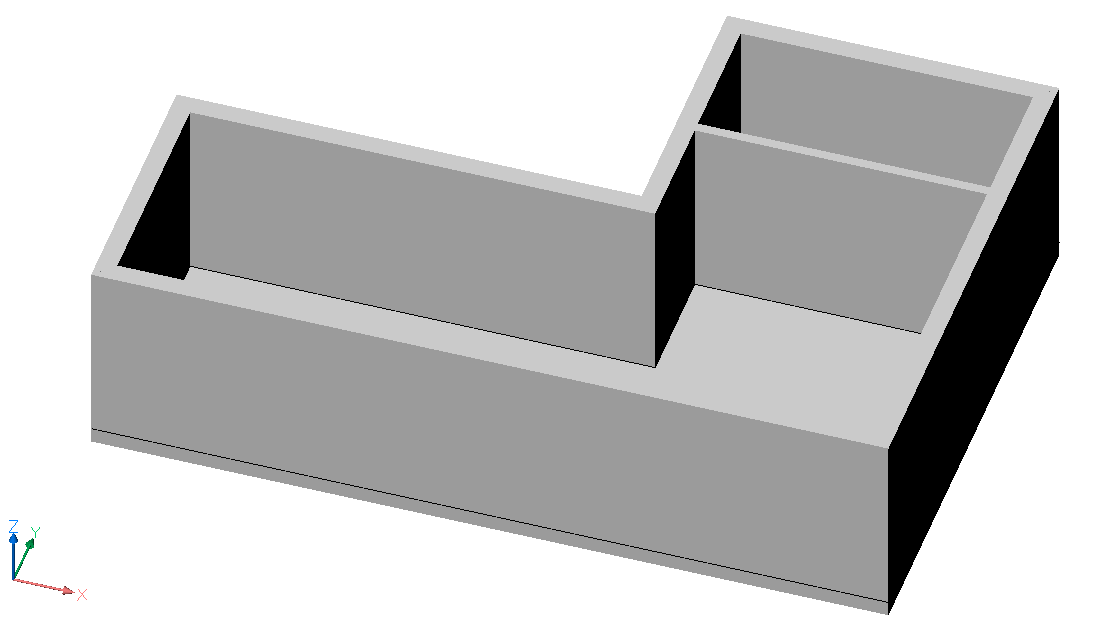
注意:墙的厚度会自动适应2D工程图的平行线之间的距离。2D计划已转换为3D模型。

注意:您可以使用与上一过程的步骤2和6相同的方法来添加地板或使用平屋顶完成建筑物。
...
Quickdraw工具使您可以轻松地开始进行概念建模。它还会自动添加BIM数据。您可以使用Quickdraw工具创建房间或整栋建筑物。使用后,Quickdraw将保持活动状态,直到您明确退出命令或执行另一个命令为止。
![]()
![]()
有关此命令的更多信息,请访问“命令参考”文章BimQuickDraw。
...
使用磁性捕捉功能,可以轻松对齐QuickDraw光标。激活该命令后,将光标移到要对齐的对象附近。QuickDraw光标会自动捕捉到对象。
您有以下选择:
| 1.对准原点 |
| |
| 2.与现有墙对齐 | 到墙本身 |

|
在墙的范围内 |

| |
| 3.对齐线 | 到网格线 |

|

|

|
到X和Y对齐的线和线段 |


|

|
平行线 |

|

设置Quickdraw系统变量
您可以使用“快速绘图设置”来设置“快速绘图”系统变量:
When the Quad cursor is in the 'No Selection' state (nothing is highlighted or selected), select Quickdraw from the Model tab, click the Quickdraw icon in the ribbon or type BIMQuickdraw in the commandline.
You are prompted: Select first point or [quickdraw Settings]:
Enter S for the Quickdraw Settings.
Specify a new value to the system variables of Quickdraw to change their default values (e.g. Default Wall Width, Default Slab Thickness, and Default floor to floor distance).
When the "auto adapt sizes"-option is turned on, the dimensions of the walls and slab of the new room will be the same as the walls and slab you snap to.
在运行Quickdraw时更改系统变量
...
- 拖动鼠标光标以定义建筑物的占地面积。
Note: If the Dynamic dimension (DYN) option is on, the current values of the room width (1) and length (2) are displayed in a dynamic dimension field.
Specify the values of the room width and length in the Dynamic dimension field. Press the Tab key to switch between width and length and press Enter or just click freely. Press Enter or Escape to leave the Quickdraw command or you can continue to create more rooms.
Place the Quickdraw cursor inside the existing building to create more rooms.
When you place the Quickdraw cursor inside the existing building, the dynamic dimension fields display the distances from the Quickdraw cursor to the adjacent walls (3,4,5,6).
When the "auto adapt sizes"-option is turned on, the dimensions of the walls of the new room will be the same as the wall you snap to.
If the cursor aligns with one or two existing walls in the model, the layout of the cursor will adapt and depict the alignment.

To actually draw new walls, choose the distances from the already existing walls to specify your first point. Move your cursor or type the values in the dynamic dimension fields to do this. Draw walls in the same way as explained in steps 2 and 3.
- 要从现有房间移除墙的一部分,首先,将Quickdraw光标与建筑物内侧的现有墙对齐。然后单击并将光标拖动到现有建筑物的外部。
外壁将变为红色(9),表示将被移除的部分壁。注意:您也可以将光标与建筑物外侧的现有墙对齐,以移除楼板的一部分。然后在现有建筑物内单击并拖动光标。
选择第二个点。以红色突出显示的墙将被自动删除,并创建一个L形的房间。

过程:创建故事和屋顶
从类似的配置开始:
请按照以下步骤创建两个额外的故事,一个浮动部分和一个平屋顶。
当四路光标在“无选择”状态(没有被高亮显示或选定的),选择的QuickDraw在模型选项卡或键入BIMQuickdraw在命令行。
单击图标(
 )以查看选项:
 顶层的完整副本。将复制所有功能(窗户,门,内墙和家具,不包括一楼外墙上的门)。
 复制楼板和顶层的外墙。
 用平屋顶完成建筑物。
对于第一个故事,请选择第一个选项(完整副本)。

注意:复制内墙和内门以及外墙的窗户。一楼外墙的门未复制。
注意:在这种情况下,不会复制家具,因为它没有分配给底层(请参阅“属性”面板)。如果要复制家具,请使用Bimify将家具分配到一个空间位置。新家具将自动分配到新的空间位置。在这种情况下,不会复制家具,因为它没有分配给底层(请参阅“属性”面板)。如果要复制家具,请使用Bimify将家具分配到一个空间位置。新家具将自动分配到新的空间位置。
注意:墙继承了在其上创建的平板的空间位置。重复步骤2。选择第二个选项(复制楼板和外墙)以创建顶层。

- To make the overhang you should remove parts of the outer walls of the second floor. First, snap the Quickdraw cursor in the corner of the two outer walls, inside the building. Then click and drag the cursor outside.
The outer walls will turn red to indicate that the walls will be removed.

Use the same method as in step 2, selecting option 3 (Finish the building with a flat roof).

Procedure: Using Quickdraw starting from a 2D layout
Open a 2D floorplan of a rectangular or L-shaped building.
Note: it is also possible to draw a simple 2D floor plan with the (poly)line command to start from. In this case, the default wall thickness of the BIM Quickdraw command will be used.
Note: The Quickdraw cursor now supports snapping to (double) lines inside XREFs.当Quad光标处于“无选择”状态(未突出显示或未选择任何内容)时,在“模型”选项卡中选择“快速绘制”,单击功能区中的“快速绘制”图标,或在命令行中键入BIMQuickdraw。
将光标悬停在外壁之一上。

注意:墙的厚度会自动适应2D工程图的平行线之间的距离。
使用磁性捕捉功能绘制外壁,以捕捉到2D工程图的线条。

使用磁性捕捉功能将光标悬停在其中一个内壁上,以捕捉到2D工程图的线条。

注意:墙的厚度会自动适应2D工程图的平行线之间的距离。2D计划已转换为3D模型。

注意:您可以使用与上一过程的步骤2和6相同的方法来添加地板或使用平屋顶完成建筑物。
...